|
Hi fellow scientists! I have finally pieced together multiple notebooks worth of notes to write a complete STRUCTURE pipeline! This tutorial is a quick-start guide to generate a STRUCTURE barcode figure from population genetics data. Although the following guide includes all the necessary steps, I recommend that you also read the user manuals for each of the included programs. All of these programs have additional information on the inputs, filters, and flags that may or may not be necessary for your own dataset. The dataset I used for this pipeline consists of 3-10 individuals that were collected from approximately 20 populations. These individuals were sequenced using Genotyping-By-Sequencing (GBS) procedures, and the sequencing was processed and filtered using GBS-SNP-CROP and TASSEL programs. Also note, because the purpose of this post is a tutorial, I will include hyperlinks to the download/installation pages for each of these programs, rather than their article citation. Creating STRUCTURE (.str) filesTASSEL Following filtering in GBS-SNP-CROP (step 7), export a TASSEL compatible data file (step 8). Using TASSEL, complete any additional post-processing filtering steps (i.e., minor allele frequency, heterozygosity, etc.) and export dataset as a .vcf. PGDSpider Convert the .vcf file into a .str file using a program such as PGDSpider. Note, if using PGDSpider with a MacOS system, you will need to launch it from the Terminal app. using the cd command, navigate into the directory that contains the PGDSpider .jar file, and run the following line: java -Xmx1024m -Xms512m -jar PGDSpider2.jar (for more information, see the PGDSpider ReadMe file), otherwise the program won't recognize your file tree. If launching on Windows, run the .exe file normally. For PDGSpider, the input format should be set to VCF (the output of TASSEL), and the output format should be set to STRUCTURE. Your input file will look something like this: 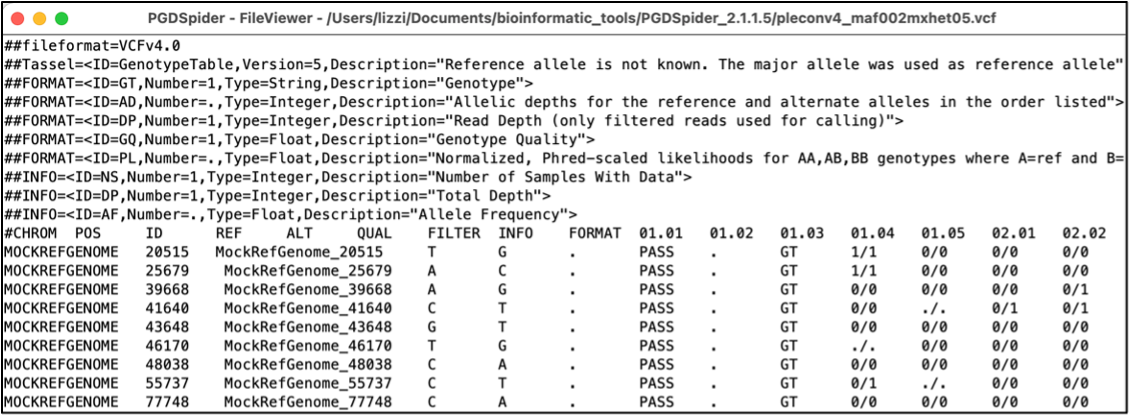 In the parser questions, the following should be set (of course adjust any settings to match your data):
In the writer questions, the following should be set:
Your output file should look something like this: 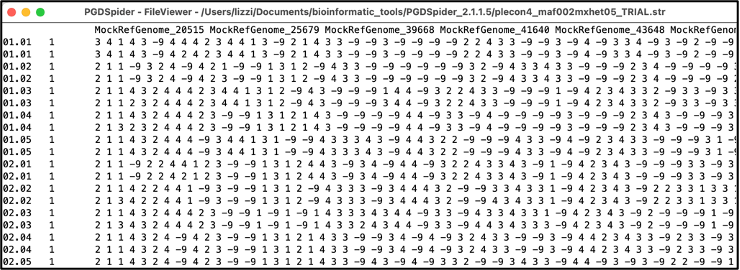 Using the text editor of your choice (I recommend Notepad++ on Windows or VS Code on MacOS), update the population IDs in the second column of the .str output file. In a .str file, the first column is typically the individual ID (can contain letters, numbers, and symbols), the second column is the population ID (should be an integer), and each following column is the SNP identification for each locus. Be sure not to edit any formatting of the .str file. Once this .str file is generated, you can use it as an input for adegenet or hierfstat, which are packages in R that can calculate pairwise metrics between populations (i.e., FST, chord distance, etc.). If you would like to make a STRUCTURE plot, use the tutorial found below. Running STRUCTUREThe next step is to run the STRUCTURE program itself. While it is possible to run this locally on your computer, it's much easier to run STRUCTURE on a computing cluster, if you have access to one! An R package called ParallelStructure offers parallelizing abilities, which greatly reduces run time for this program. However, you will still need to have the base STRUCTURE program installed. The three required files:
library(ParallelStructure) setwd("[your/file/path"]) parallel_structure(infile = "structure_file.str", output = "results/", joblist = "ParallelJobs.txt", n_cpu = [# requested cores for parallelization], structure_path = "path/to/structure/program/function/", numinds = [number of individuals], numloci = [number of loci], ploidy = [ploidy; how many rows per individual in str file. Typically 2 for diploid], label = [column with individual labels], popdata = [column with population data], markernames = [row with loci names], missing = [missing data value; typically -9], locprior = 1, printquat = 1) 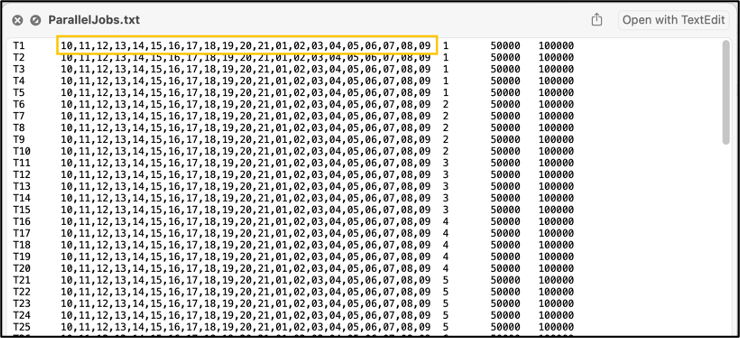 STRUCTURE will output a bunch of files in your specified output path. This will be parsed into a more reader-friendly format in the following steps. Use the compress or zip function in Windows or MacOS (or the zip command in Linux) to zip your results file for Structure Harvester. Parsing the STRUCTURE outputStructure Harvester The program Structure Harvester helps you interpret the STRUCTURE output and provides an easy way to identify the ideal number of clusters. Navigate to the Structure Harvester webpage and upload your zipped results file. It’ll take a few minutes to run, and the page will automatically refresh with your results. At the top of the page, there will be a download button. Download it and untar and unzip the file (tar -xvzf archive.tar.gz) for the next few steps. One of the main take-away points of Structure Harvester is the plot of Delta K and the Evanno table. This is part of the downloaded dataset or can also be seen in the web browser of Structure Harvester once the data are processed. Scroll down to the Delta K plot, which should look something like this: 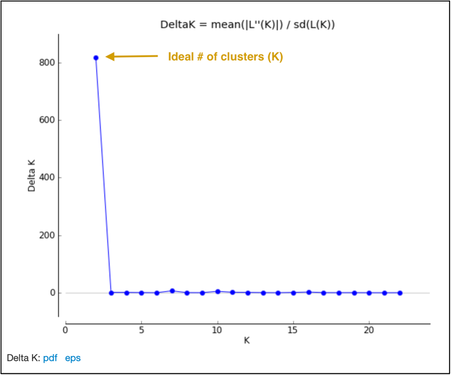 The optimal number of clusters for the data set is at the peak of this Delta K plot (see the arrow in the figure above). This data set has an optimum of 2 clusters, which is the minimum number of clusters possible. Another visual of the cluster patterns for these data is in the Evanno table farther down in the Structure Harvester output. It should look something like below. Note that I tested from 1 to 23 clusters (specified in jobs list text file described above), and 2 clusters was still the best option. 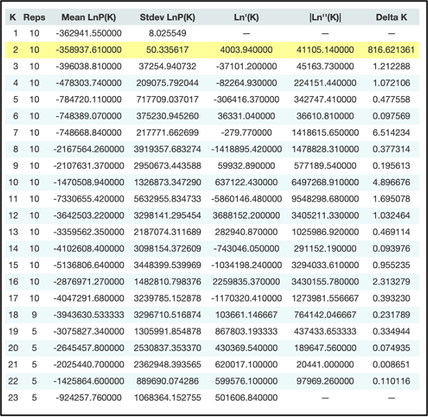 CLUMPP CLUMPP is a program that checks for biases in the STRUCTURE assignments. Move the appropriate files corresponding to your optimal number of clusters out of the Structure Harvester downloaded dataset (for the above dataset, the ideal number of clusters was two. Therefore, I would move files K2.indfile and K2.popfile.) into the folder containing the CLUMPP executable (I've had trouble getting the MacOS executable to work, but the Windows one works just fine). CLUMPP is run by editing the paramfile file and then executing CLUMPP.exe. You will have to run this program twice: once for individual data and once for population data. Population data: In a text editor (e.g., Notepad++, TextEdit, or VSCode), modify the following parameters:
Individual data: In a text editor, modify the following parameters in the paramfile:
STRUCTURE visualization distruct distruct is a program that makes pretty, but not easy, figures for STRUCTURE. distruct operates a very similar way to CLUMPP where you edit a parameter file and run an executable. You will need to have a program that allows you to view a .ps image for this program. Mac’s Preview application can open a .ps image by converting it to a .pdf; Windows will require an additional program to view these images (I know GIMP works, which is an open-source photo editing program, but it’s a bit clunky so there might be better options out there). To run, copy the OUTFILEs for both the individual and population runs of CLUMPP into the distruct folder. Rename the extension on the individual file to .indivq (i.e., indK2.indivq) and the extension on the population file to .popq (i.e., popK2.popq). The INDIVQ file should look something like this, with one line per individual and the number of columns of the right side of the “:” symbol corresponds to the number of clusters (I have two clusters, so there are two columns on the right side of the colon): 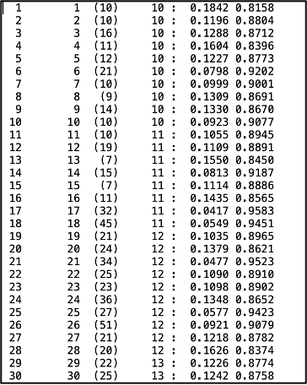 The POPQ file should look like this, with one line per population: 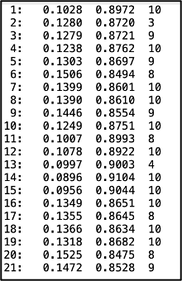 You will also need to make a .names file (i.e, popK2.names) with the names of your populations, if you’d like to include them in your figure: 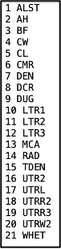 And finally, you’ll need a .perm (popK2.perm) file with the specified color of each cluster. See the distruct documentation for color options:  Edit the drawparams file in a text editor. Include your .popq, .indivq, .names, and .perm files (note, I cannot get this program to add labels below the figure for whatever reason, but it will happily add them to the top of the figure. You may have to play around a little bit with the settings!). Make sure to also update the parameters for K, NUMPOPS, and NUMINDS to match your data. The rest of the drawparams file defines the appearance of the figure itself. You may have to run this program multiple times and iterate through the settings until you find parameters that work for your dataset. I found the following to work well for my data:
I then cropped and rotated my figure with the following result! If any additional formatting is necessary that is not possible within distruct, I recommend a photo-editing software such as GIMP. The final result: 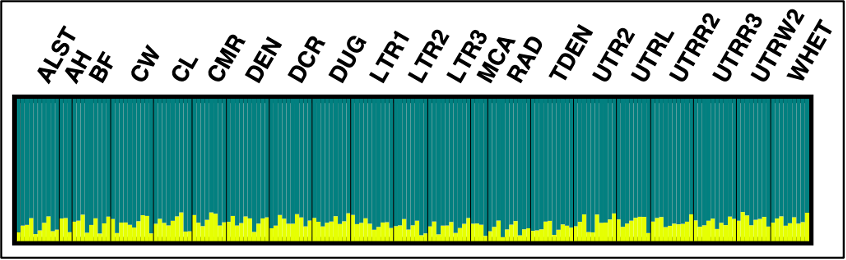
0 Comments
|
Elizabeth Scott (Hendrickson)I am a plant biologist specializing in ecological genetics. This blog is dedicated to sharing the many tutorials in my lab notebooks with others. ArchivesCategories |
 RSS Feed
